A guide to large scale scratchbuilding
NOTICE:
Proceed at your own risk: The proper usage of these tools is entirely your responsibility. As we have no control over your working conditions we can take no responsibility for injury or malfunction of process carried out by you as a result of reading or following any text on this page and/or site.
This article was written with Gauge 1 models in mind. The tools and practices below apply primarily for these larger scales, but some techniques are the same for smaller scales as well.
TOOLS:
Before one even broaches the subject of pasting all sorts of plastic bits together, it is absolutely essential that one have at their disposal the proper tools for doing so. Precision is key (though once in a while, something must be fudged), and simply cutting plastic with scissors and a rudimentary knife is not going to result in a good model.
That said, the tools themselves are easily as expensive as building one locomotive model without the frills ($150-$200), but, unlike the model, the tools can be reused for the next – the investment is, without question, worth the price. For that matter, the listing of tools that I outline here are reasonably few – just enough to do the job. Compared to the stock of tools that would be available to the TV modelers at Clearwater Model Making Systems, this would be considered quite easy on the budget.
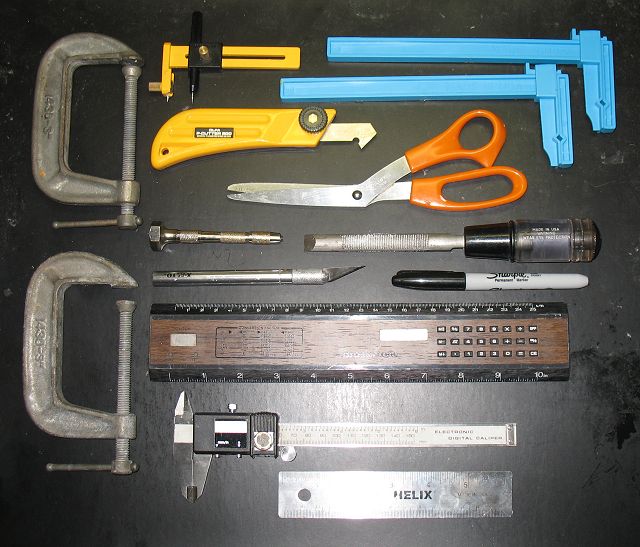
The tools shown are as follows (described approximately from top to bottom, and from L to R):
- C-clamps (far left): These are a necessity for when scribing large sheets of styrene. Use them to hold your metal straightedge against the line that you wish to cut. Extremely handy when scribing thick .100″ styrene, or when you cannot reliably hold your straightedge down.
- OLFA CMP-1 compass cutter: Absolutely necessary for cutting circles in styrene, or in Scotch tape for masking. Do NOT substitute for X-Acto’s X7753 compass cutter for styrene cutting work – the X-Acto model flexes under the slightest of pressure and does not produce good cuts. It is for far lighter duty work.
- Plastic clamps: Shown are Excel’s #55663 Large Adjustable Plastic Clamps. They do not provide much pressure when locked in place (and, used incorrectly, can be a disaster), but do a smart job of keeping very light assemblies square; for example, a tender, or boiler base.
- OLFA P-Cutter: Not a cutter as much as a scriber – this tool tears a groove into the thickest of plastics, slicing the styrene apart where needed. Model shown is the P-Cutter 800, though the 450 would probably do an equally decent job.
- Scissors: Always useful to have around when you need to cut masking tape, or do a quick hack job on some styrene.
- Pin vise: This is a hand-held drill. You will need drill bits to go along with it. Make sure your drill also has the capacity to hold extremely small bits – you might need to use such bits for grab iron holes or other details of that nature.
- Rough hand file: Excellent for when you need to quickly smooth out a roughly scribed edge of styrene. Curved edge excellent for smoothing out a rough cut from the compass cutter.
- X-Acto No. 2 knife: The jack-of-all trades – cuts the difficult stuff, can be used to cut off rough edges, does light scribing, cuts pinstriping, etc. I prefer it over the smaller X-Acto No. 1 when working with large scale. Get spare blades, tips break easily.
- Sharpie pen: Always handy – pencils even more so.
- Steel straightedge: Mine is an old digital ruler, but any straight steel piece with a perfect edge and similar dimensions suffice. Use it to ensure a straight cut when scribing styrene; use the C-clamps on top of it to ensure that it does not slip.
- Caliper: Not entirely necessary, but occasionally handy when you need a precision measurement.
- Short ruler: Handy for quick measuring of styrene sections. Short length makes handling easier around your work area.
- NOT SHOWN – Mitre Box & Razor Saw cutter. Must-have for nice 90 and 45 degree cuts. I use Excel’s myself: Excel Hobby Blades – Mitre Box & Razor Saw Sets
Not shown, but recommended is a Dremel rotary tool. Wall units are preferred for convenience, but you may want to keep a battery-operated version around for slow speed applications where you do not want to risk melting plastic (granted, at that point, some may argue that you shouldn’t be using the Dremel).
MATERIALS:
There are two “sets” of materials. One are your construction materials, the other are your consumables:
Consumable materials::
- 2″ masking tape: Use for masking off large sections of a model.
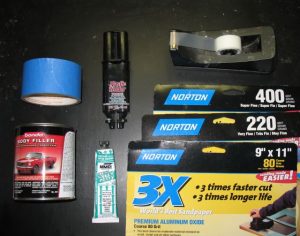
- Devcon Plastic Welder: The God of all glues. This stuff holds every bit of styrene you see on these models. It is expensive, but it is UNBELIEVABLY strong (though I have been unfortunate enough to get one slow-setting tube in my experiences). Never expect to separate something previously glued by this product. Sets in minutes (4 by the advertisement, 2 in practice), and cured in 15. Expensive, but I wouldn’t use anything else for work such as this. Consistency is thick and gooey – I would not use this glue on smaller scales.
- Scotch tape: Excellent budget masking tape for sharp edges, but if you already use something that works better for you, use that instead. Burnish it down until no air bubbles are present, then burnish it some more, or it WILL promptly leak.
- Sandpaper: You’ll need it, and a lot of it to sand down the fillers you will be using, especially Bondo (hence the 80 grit). 80, 220, 400 are musts – 120 and 600 are strongly advised as well. If you intend to mould faces, you will need 1200 and possibly 1500 grit.
- Bondo Automotive Body Filler: Two-part, messy filler that takes a while to dry, and seems dry 6 hours after application – but it isn’t. Excellent for filling very large voids, or voids that need structural strength in the gap. Eats up sandpaper like no tomorrow, hence the 80 grit for initial shaping. Do not overdo your applications of it.
- MMD/Squadron Green Putty: A much easier putty for detail work, sands considerably smoother then Bondo, and is a lot easier on sandpaper. Use for non-structural areas that need smooth, careful detailing. Avoid the white putty.

Base construction materials:
In general, one should get themselves a large array of styrene for modeling mayhem, but the following selection serves as a good starting point. If you can’t get Plastruct, Evergreen plastic sheet equivalents will do just as good: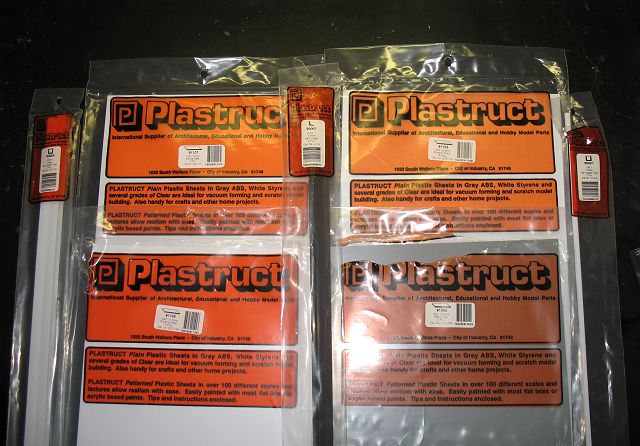
- Plastruct #90624 5/16″ square tube: Good to have, but rather weak and has a tendency to crack. Occasionally has a good use though, so I keep it about.
- Plastruct #91104 .040″ styrene sheet: Nice, medium thickness sheets work well for flat panels and such. Can warp in the use as cab sides or other similar purposes – make sure it is backed with some structural support.
- Plastruct #90007 5/16 ABS 90% angle: The styrene to use as a 90 degree support. A must-have.
- Plastruct #91103 .030″ styrene sheet: Thinner then #91104, excellent for areas where #91104 would be too stiff if bent, or simply too thick.
- Plastruct #90621 1/8″ square tube: Ideal for backing areas inconspicuously, for instance, behind footplate side skirts.
- Plastruct #91107 .100″ styrene sheet: Thickest styrene sheet of the lot. Very stiff, hard to cut, but THE material to use to create a scratchbuilt base chassis (if required) and as the main structural rigidity of your shell (as a wrap-around footplate or partially integral chassis).
- Plastruct #91002 .020″ styrene sheet: Thinnest styrene sheet, ideal for areas where considerable curves are needed, and strength is not a priority (if it is, 90621 serves as a good brace, particularly under cab roofs). Splasher tops in particular, and quite occasionally, cab roofs.
Misc materials (Gauge 1 only):
For those of you doing accurate TVS characters, this pintstriping is essentially the same as the stuff used on the TV models. 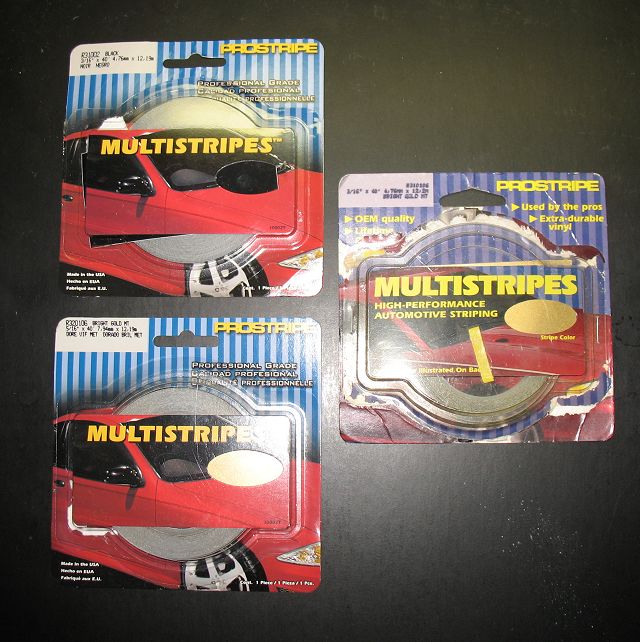
Prostripe (3M tape, rebadged) provides an adequate selection in the U.S. through auto shops such as Pep Boys. You may have to buy a dual-stripe set and cut the two stripes apart. The backing (fronting?) tape will remain, but will provide a method of holding the tape with less of a chance of marring the pinstripe.
Other no-brand China pinstripe equivalents are available on eBay for the international market, and it should do the job too.